Mt. Whitney is a bucket list climb for hardcore and newbie climbers and hikers alike. Tall as Whitney is, the summit is within reach for well-prepared mountaineers.
Kilimanjaro gear expert Connor has summitted Whitney in winter and summer conditions. Read on for his insider advice and preparation guide to a safe and successful Mt. Whitney summit!

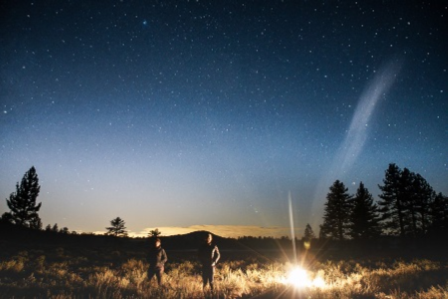
Connor taking his final steps to the Mt. Whitney Summit
Here's Connor:
Ah, Mt. Whitney, a mountain that towers just over 14,500 ft over the Eastern Sierras and the high desert below. A mountain that is stunningly majestic and beautiful, yet challenging and potentially deadly as well.
Thousands of climbers attempt Whitney’s summit each year, however many fail due to unforeseen circumstances, unpreparedness, or altitude sickness. When planned right, and with a little luck on your side, Mt. Whitney makes for an unforgettable experience.
Two Routes to the Top
There are two main routes to climb and two seasons you can attempt Mt. Whitney.
The first and most popular way is via the main Whitney Portal Trail to the 99 switchbacks during the non-winter season. During this peak demand season, you'll have to compete with thousands of other people in a climbing permit lottery.
The National Forestry Service issues 60 overnight permits and 100 day-hiker permits each day during the popular climbing season. For more information on Mt. Whitney permits, click here.
If you are newer to climbing, backpacking, and hiking, this route option may be the best choice for you as the level of technical difficulty is quite low. However, the distance and elevation gain is definitely challenging.
The less popular (and more technically exciting option in my opinion) is during the winter season up the Mountaineer’s Route. This route, and season, is the one we chose intentionally to expose ourselves to more of a true alpine environment and to avoid the crowds.
However, this route does require more alpine experience and technical equipment. You will need ice axes, crampons, ropes and anchors (optional) and an array of other winter climbing and camping gear (read up on my winter camping tips here).
If you're up to the challenge, keep reading, and maybe you too can add the Mt. Whitney notch to your belt.

Sunrise between Upper Boy Scout Lake and Iceberg Lake – 12,000 ft.
The Mountaineer's Route
Once you have the gear needed and experience necessary to climb the Mountaineer’s Route (MR), what's next? When should you plan the climb? Where should you start? What can you expect? How long does it take?
These are all questions I had when considering climbing Mt. Whitney. The first thing to consider is the time of year you plan on climbing. If you plan on doing the MR during the non-winter season, you will need to apply for the same permit as you would the main trail which unfortunately means that you will be subject to a lottery (another reason I climbed Mt. Whitney during the winter).
During the winter, or anytime between November 1st and May 1st, you don't need to apply for the lottery permit. Instead, to get a permit, you can simply fill one out at the unmanned permit post at the Lone Pine Ranger Station.
The best time of the year for winter climbing up Mt. Whitney is between the months of February and May as previous snowfall will provide decent coverage of rocks, trees, and debris (Early winter climbing is not recommended as many rocks and debris will be exposed and icy making traveling very difficult and dangerous).
Permits and Weather Permitting
So now you have your dates and permits set, the next consideration is weather. Will you be climbing in the midst of a snowstorm or gale force winds (winds atop Mt. Whitney have been recorded to hit over 100mph)? Hopefully not! You'll have to rely on forecasts to make sure your weather window is clear of any major storms. Weather can change very quickly at altitude. Be prepared for cold weather, windy conditions, and check avalanche hazard areas as well.
During winter, the Whitney Portal Road that leads up to the trailhead may be closed depending on snow conditions. This can happen after large amounts of snowfall, so it is a good idea to check ahead and call the ranger station to confirm.
If the road is closed, you will need to begin your climb from the gate, adding another 4 grueling miles to the already 16-mile trip. When we took on our winter summit bid, luckily for my partner and me, the road was open and we were able to park in the parking lot just beneath the trailhead.
Taking that First Step
After determining the gear you need and nailing down your climbing dates and weather window, it’s finally time to start the adventure! To get to the trailhead, you will need to take Highway 395 into Lone Pine, CA. The address of the trailhead is “Whitney Portal Rd, Lone Pine, CA 93545.”
Once you are at the trailhead, it all begins to feel surreal – you are actually doing it! You are climbing Mt. Whitney!!

Take the North Fork Lone Pine Creek Trail leading off towards the right.
For the first mile, you will be following the main Whitney Portal trail up a gradual incline until you reach a fork in the trail with a sign reading “Mt. Whitney Trail” and “North Fork Lone Pine Creek.”
Follow the Fork
You will choose the steep route up “North Fork Lone Pine Creek.” You'll know you're going the correct way almost immediately as the trail quickly becomes significantly steeper and more rugged.
As you continue up, you will reach the creek. Be sure to traverse to the left side of the creek as the right side become too steep and turns into a large cliff.
Be careful in this area as snow bridges across the creek have been known to collapse and send climbers into the creek below. During our climb, two other climbers were swept down into the creek by an avalanche just an hour after we had passed through.
(Pro Tip: If traveling during freeze/thaw conditions, start your climb before sunrise or after sunset to avoid potential avalanches).
As you continue on, you will reach Lower Boy Scout Lake. This a great pitstop to rest, refill your water supply, and grab a snack before making the next push to Upper Boy Scout Lake.

Ridge on his way to Upper Boy Scout Lake
Lakeside Camping
Many climbers decide to camp at Upper Boy Scout Lake for the night as the elevation is lower (11,350 ft). Some also choose to make their summit bid from here without all the heavy camping equipment.
There are three main areas you can camp. The two most popular are Upper Boy Scout Lake (11,350 ft) and Iceberg Lake (Directly under the Mt. Whitney Chute and Mt. Whitney itself at 12,620 ft.
My partner and I were planning on camping at Iceberg until we spoke with an individual who has climbed Whitney numerous times. He told us about a plateau between Upper Boy Scout Lake and Iceberg Lake. It's a lesser known location to camp but serves as a great starting point for summit day. This obvious plateau sits around 12,000 ft in elevation directly above Upper Boy Scout Lake.
When setting up camp, be sure you know the wind forecast and prepare in advanced. My partner and I were faced with 50+ mph winds the morning we were packing to head down the mountain. We had to build a wind wall the day we set camp which prevented our gear from blowing off the mountain during the intense wind.

Base camp dwarfed by Mt. Whitney above during early morning light.
Summit Day
This is it. The final push to the top; the reason you climbed Whitney. Everybody climbs differently. I am a firm believer in early morning starts to avoid any afternoon wind, storms, and snow/ice thaw that can cause avalanches.
My partner and I started our morning at 3:30 AM, packed, had a small, light breakfast and headed up at 4:30 AM. From basecamp, we made our way to Iceberg Lake within an hour. The sky became a lighter shade of blue and dawn was upon us.
Chute for the Summit
From the base of Iceberg Lake, you can see the massive chute that you will be climbing for the next couple of hours. As you make your way up the chute, you will quickly realize how painful each step is. The oxygen levels at this point have many people turning around. Those who don’t turn around are moving quite slowly.

Smiling helps the pain, and the view doesn't hurt either
At the top of the chute, you will come to a spot called “The Notch.” At this point, you can go directly left and up class 3 terrain so-called the “Final 400” (ropes are optional on the final 400, however many teams my partner and I observed were using them. We decided to not bring a rope to save weight, however, looking back, I wish we had).

Ridge topping out at the Final 400
There is also a traverse around and up to the right of the Final 400. This way is class 2 climbing, however, a fall on either route can be fatal. For more information on the final two route options, click here.
Once atop either the Final 400 or the Traverse, you’ve made it! You now stand on top of the highest mountain in the continental United States. Sit back, refuel, enjoy the spectacular views, explore the summit hut, and take a picture at the Mt. Whitney summit sign; you earned it.

Summit Hut – Mt. Whitney 14,503 ft
What Goes Up Must Come Down
Crazy to think that once you summit, you're you're only halfway done with your journey. Be extra cautious on your descent as most injuries and accidents occur on the way down.
Most people go down the same way they came up. This is the most direct and comfortable route as the climber is familiar with the territory. Once down the Final 400 and beneath the chute, you can choose to camp another night and finish the descent in the morning or push through.
My partner and I chose to stay another night and break camp in the morning. This allowed us to enjoy the views one more night, recap on our summit, and be extra sharp the following day.
Once back at the trailhead, take a dip in the ice-cold river and enjoy a hot meal at the Mt. Whitney Restaurant back in Lone Pine. Congratulations!